Search
  • Blog
  • About
  • Contact
  • RSS
Close
Menu
Search
Close
  • Blog
  • About
  • Contact
  • RSS
Menu

Pen + Keyboard

Writings on Fitness, Food, and Life

May 2, 2014

DIY Tree Stump Side Table

by Jenni in Lifestyle


How to make a DIY tree stump table

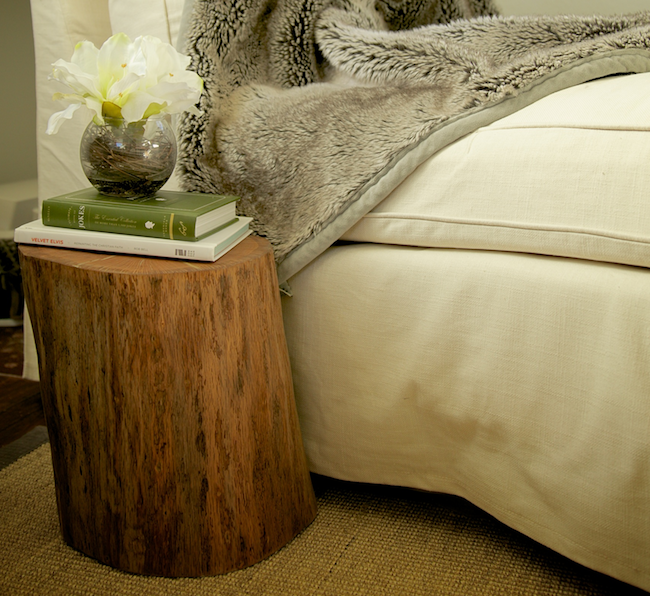
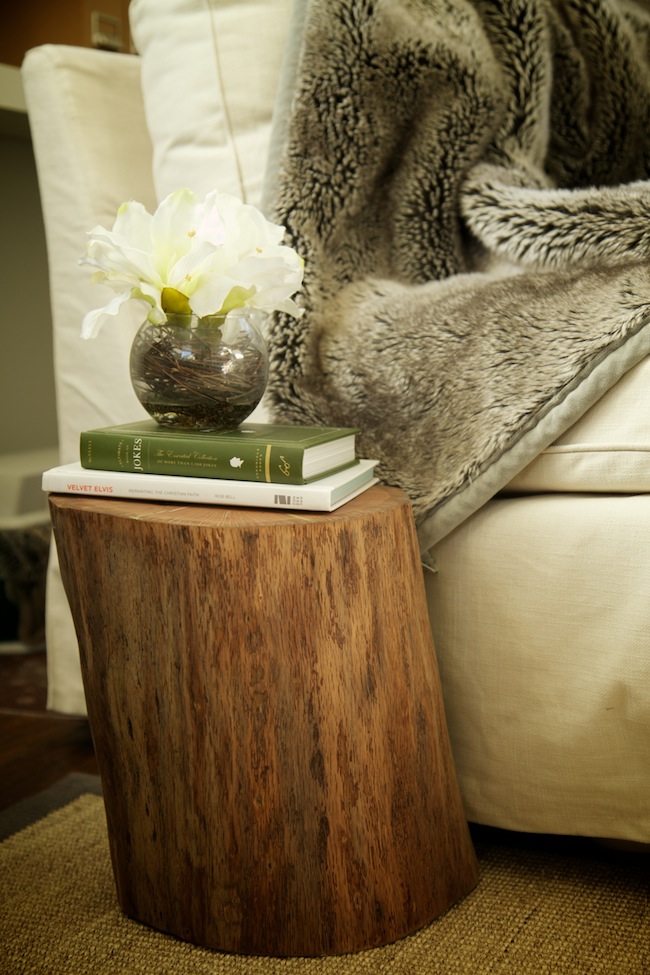
Ever since Ellen started her show all those many years ago, I have been obsessed about her coffee table. Back then, a tree stump was not something commonly made into a table and getting one was near impossible. Flash forward a decade and they are everywhere, usually costing upwards of $200. Now, do not get me wrong, I love home decor as much as the next Emily Henderson addict, but $200 for a sanded and stained tree stump just seems plain crazy.

Enter the tree stump DIY. Tree stump DIY's were created by people who, like me, do not enjoy paying wads of cash for something from their own back yard... No matter how perfect for that one random spot. The best part about these tree stump DIY's is that you have the choice of where the tree is from and can rest easy knowing you are not contributing to deforestation for decor. Finally, my conscience can rest easy. 

How to make a DIY tree stump table

Like so many people out there, it took me a long. time. to warm-up to this whole tree stump DIY. My DIY skills end far before painting anything and my patience is that of a two-week-old puppy. Thankfully, this stump is way easier to make than it looks, and does not take that long either. Trust me, if I can do it, you and your 4-yo can as well. 

Remember, all of this should be done in an open, well ventilated area. 

Supplies

DIY tree stump side table
  • Tree stump
  • Chisel and hammer for bark
  • Pain brush
  • Power sander and sandpaper
  • tarp
  • rags
  • stain

1. Pick a Stump

tree stump DIY

My stump is from a downed tree in my in-law's yard. The maintenance guy cut it level for me and removed the bark. If your in-laws do no have a downed tree, check out local lumber yards, lawn companies, or tree cutters. Chances are that they have some spare stumps they would almost pay you to take. The stump should be free and, if you ask, they will probably level it for you as well!

2. Remove Bark

This step does not have any pictures since it was done for me, but it is rather simple to do. All you need is a hammer and a chisel. Place the chisel between the bark and the wood and hammer the top of the chisel handle downward. The bark should come right off. Do this to the entire tree. 

Here is a great how-to for this step :) She does her tree table a bit different than mine, but this is also a great resource if you want to add legs to yours. 

3. Dry and De-Bug

We want to make sure that the wood is dried and there are no critters hiding in it. I completed a termite and bug removal on mine just to be safe. Bug and termite wood removers can be found at your local hardware store. Complete as directed, then allow the stump to dry. If your stump is older, it may already be dry enough. Otherwise, leave it in a dry place for a week or more. 

I left mine in our dry garage for a year, but that was procrastination over safety. 

4. Sand, Sand, Sand

DIY tree stump table

Next up is sanding. It is best to use a power sander for this part, but some serious elbow grease will work all the same. I wanted my stump to have a natural, non-shiny, look and decided to use a stain alone. Whatever stain you choose should have a sandpaper grit recommendation. Mine recommended 220. 

Sand the top, sides, and bottom until all are smooth to the touch. If your tree stump has any large cracks, use sandpaper to sand in them as best you can. 

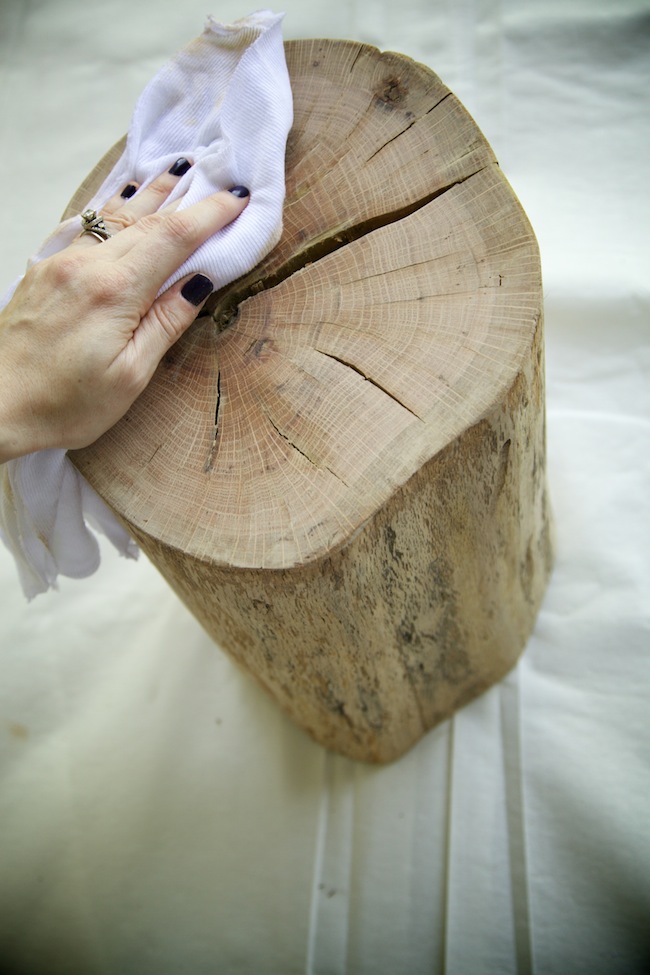
Once finished, wipe down so no dust remains on the stump. 

5. Wood Filler

How to use wood filler on a tree stump table

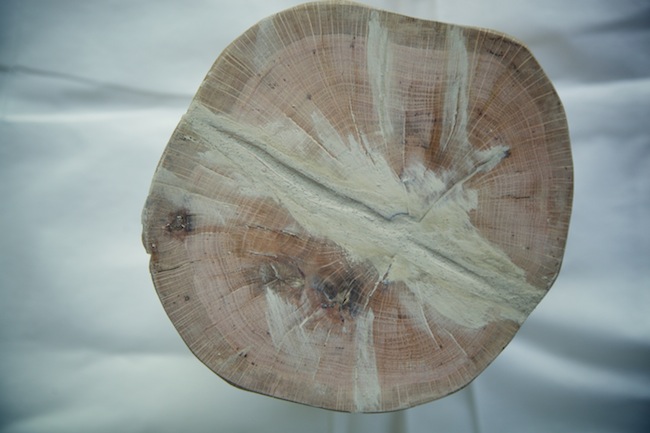
My stump had a pretty big crack in the center that I decided to fill with wood filler. If your stump has any large cracks or divots that you wish to fill in, use a wood filler that is able to be stained and use according to filler directions. 

The wood filler will need to dry; this could take anywhere from 15-minutes to 4-hours, depending on the size of the crack or divot. When dry, the filler should be hard to the touch.

6. Sand, Again

How to use wood filler

Once your filler is dry, you will want to sand it down so it is level with the stump. I also sanded off any excess that got on other areas it was not needed. This is highly recommended since the stump will look more natural with less wood filler used. 

Again, wipe the stump clean so no dust remains. 

7. Stain

staining a tree stump table

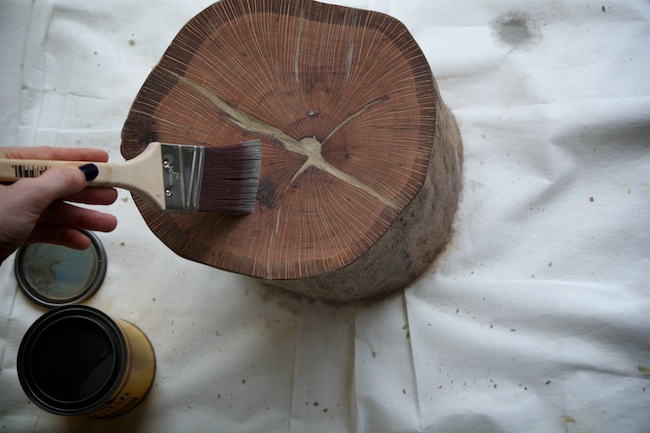
The stain you choose makes a BIG difference to how the stump will turn out. I plan to bleach my next one, but this one I wanted a bit darker grey so I used Weathered Oak by Minwax. Stain according to package directions. Be sure to use a good paint brush or cloth for this step. The key is to get as few bubbles as possible and have the color blend well. Next up is wiping that stain off.

8. Wipe Clean

staining wood

If you do not want your stain to be dark, do not leave it on long. The longer the stain is on, the darker the stain will become. Minwax recommended I keep mine on for 5-15 minutes. I started wiping excess stain off after 5-minutes. 

To wipe stump, use a clean, dry rag that will not leave fibers behind.

9. Let Dry

tree side table

If you want more than one layer of stain, let the stain dry according to directions. This is usually 4-6 hours before adding another coat. Complete as many coats as desired with the same stain, then dry process. Do not sand between staining. 

Once you are happy with your stain amount, let the stump dry for 8+ hours. 

When the stain is dry, you are ready to bring it inside and marvel at your accomplishment. See, I told you it was not that bad! Sure, it does take a while for the drying times, but at least you do not need to be working on it for those 4+ hours! 

Comment

TAGS: how, to, make, a, tree, stump, side, table, natural, staining, how to, stain, use, wood, filler, fill, in, cracks, deep, is, worth, it, benefits, of, no, polyurethane, sealer, remove, bleach, lighten


March 9, 2014

This Week in Workouts: Goal!!!!

by Jenni in Fitness


Tree pose on the beach

This week has been both an incredibly accomplishing week, and, at the same time, a pretty slow week for workouts. First off, Wednesday was, hands down, the most traffic P+K has ever gotten! It was great; every hour was nearly twice as many views than we usually get in one day, and it never seemed to end. I have no idea why Wednesday was so incredible, but it was awesome.

This week has also been pretty great on the yoga front. I completed two hot power flows with my new favorite yoga instructor, Angela Mynatt, at Body Heat Yoga. She is awesome. These were great and my arms are soooo sore. But, the handstand now has a check-mark next to it and so does this pose. Awesome. And sore. So sore.

Oh, and I also found this show by Tara Stiles. It is so fun and I must try her vegan mac and cheese recipe. Like right now.

Today we are also going to see the Ski-a-rees here in Sarasota with my Dad and step-mom and grabbing some lunch before-hand. The weather has been perfect and I have been wanting to see these awesome performers since I learned they were here (and have been for like 30-years). Tonight will also be the return of Once Upon and Time and I am soo excited!!! Anyone else on team Hook? I totally am. But now, to the workouts! And some lazy kittehs....

Caturday- lazy kittehs

Workouts

Sunday: Rest day :)

Monday: 2-mile interval workout followed by a 10-minute Ballet Yoga fusion arm workout that I will be adding soon!

Tuesday: Hot Power Flow that was perfect! Also mastered this pose that day :D

Wednesday: Rest day :)

Thursday: This 30-minute advanced yoga flow that was a great home flow for those wanting to push themselves.

1932707_669828863064118_870322868_o.jpg

Friday: A quick 10-minute Ballet Yoga fusion for arms and this Ballet Workout for The Bum. That night we also went to the book launch party of our friend's new book Epic of Haven: The Great Darkening. It is an epic book and I am just so happy that we have been able to be a part of it!! Also, you can download it here for freeee! But also buy the hardcover, it is worth it.

Saturday: 90-minute hot power flow that was the best thing ever. I then went home, ate lunch, and took a nap. Yea, Saturday was pretty great!

pinterest-25154.html

Comment

TAGS: tara stiles, vegan mac and cheese, recipes, yofa for hangover, ski-a-rees, once upon a time, yoga rebel, body heat yoga, angela mynatt, peacock pose, handstand, how to do, how to, advance yoga flow, at home, half moon pose, ballet bum workout, epic of haven, r.g. triplett, the great darkening


March 3, 2014

Yoga Positions to Work Different Muscle Groups

by Jenni in Yoga


Yoga for different areas

Happy Monday all! Did anyone watch the Oscars last night? I absolutely loved Lupita Nyong'o's and dress her acceptance speech and Ellen was ridiculously hilarious. We enjoyed the Oscars at an Oscar party that good friends of ours host every year. Every year we fill out ballots for who/what we think is going to win and put some money in the pot for the winner. This year there were three winners and the hubs was one of them. Shopping time! Maybe he will spend it on some yoga classes or new yoga wear like I would, but probably not. For now, I will just have to do these yoga poses in my usual garb...

These yoga poses are some of my favorites for different parts of the body. Sometimes we may want to work one area more than others, or, avoid it like the plague. The least thing I ever want to see the day after an intense arm workout is anything to do with cobra- so much pain! But, if you are wanting to work a certain area of the body, these are the poses I recommend focusing on for speedy results.

The Back

  • Stretches: Happy baby and Cat and Cow poses.
  • Tone the upper back: Downward Facing Dog and Plank Position.
  • Tone the lower back: Cobra and Locus poses.

The Bum

  • Stretches: Pigeon and Double Pigeon poses.
  • Tone the outer bum: Chair pose and Warrior II pose
  • Tone the upper bum: Bridge pose and any variation.

The Arms

  • Stretches: Dolphin pose and Tree pose
  • Tone the shoulders: Dolphin and Downward Facing Dog poses
  • Tone the upper arms: Chaturanga is great for those "bat wings". Side Plank pose and Crane poses

The Abs

  • Stretches: Sphinx pose and Upward Facing Dog
  • Tone the obliques: Revolved Triangle pose
  • Tone the abdominal: Eagle pose, Full Boat pose, and Plank
Comment

TAGS: fitness, yoga, train, tone, get, fit, great, legs, arms, shoulders, back, bum, butt, abdominals, core, abs, workout, in shape, poses, pose, for, how to, complete


February 5, 2014

5 Tips for Getting Over a Sickness Fast

by Jenni in Health


5 tips for getting over a sickness fast

Well folks, there is definitely some sickness going around and it seems that our whole family went to Disney in time to get every bit of it. The hubs is doing better, but now it is my turn to meds and vitamins shoved at me like candy at Halloween. No one likes being sick, that is just a fact. Here are five super easy and super quick ways to get over an illness and get back to being your awesome self!

Take Loads of Vitamin C

Vitamin C is one of the best natural healers. This stuff gives our body the extra strength it needs to fight off infections and illness. When sick, our family takes about three times the vitamin C we would usually take in a day. Our bodies cannot store or create vitamin C, so taking it daily is important and taking it when ill gives us another way to fight that yucky, yucky, sickness.

Use Lotion, Often

This may seem odd, but when we are sick, we tend to blow our nose a lot. Blowing our nose is great, except when it starts getting red and swollen and achy. This is never a nice feeling when a fever sets in and your nose is running but using a tissue sounds like torture. Avoid this by continuing your to apply facial lotion around the nose. I have started this tradition and have made it though a cold or two without any red-nose syndrome.

Do Not Give Up Working Out

We get sick. Our muscles ache, our joints throb, and our head feels like someone is continuing to hit it with a baseball bat. Working out is usually the last thing we want to do at this point, but it will help... Just not the usual workout. Quick and easy yoga flows or Pilates workouts are just what the doctor ordered when sick. Even simple stretches will help reduce pain and inflammation in the joints and help release toxins from the body.

Water, Water, Water

Drinking water is vital when sick. This is probably one of the hardest things for me to do when a fever sets in, but oh is it important! When we are sick, we get dehydrated. To make it worse, we have way too many toxins and impurities in our bodies. Drinking more water than usual will keep us hydrated and help clear toxins out of the body so we can recover faster.

Relax

It is hard to miss work or to spend a day in bed when there is simply no time for it. Sure, we may not be able to sleep all day until our illness is gone, but take it easy. Our bodies are doing a lot when we are sick and working them as hard as usual will not make it any better. Little things that always help me are wearing comfy and cozy clothes, walking slower (not that we can help it when are joints are like stone), always having chapstick, and going to bed earlier. It is also a good idea to rest as often during the day as possible.


Comment

TAGS: why, take, vitamin c, when, sick, quick, remedies, get, better, ways, to, what, do, illness, vitamins, how to


  • Newer
  • Older
  • Oh look, @jcrew sent us a cat, and in my favorite color too!! How kind of them 😻 http://t.co/MNEjROeSpE
    Oct 14, 2014, 9:54 AM
  • This Week in Workouts (3)
  • Meat Free Monay (11)
  • Simple Systems (12)
  • Thrifty Girl (12)
  • Meat Free Mondays (20)
  • Yoga (30)
  • Health (51)
  • Food (61)
  • Lifestyle (162)
  • Fitness (312)

Copyright © 2012 · All Rights Reserved · Pen + Keyboard