Search
  • Blog
  • About
  • Contact
  • RSS
Close
Menu
Search
Close
  • Blog
  • About
  • Contact
  • RSS
Menu

Pen + Keyboard

Writings on Fitness, Food, and Life

August 19, 2014

5 Must Haves for Camping

by Jenni in Lifestyle


Must haves for every girl going camping

We recently went on a massive camping trip that included hiking on the Appalachian Trail and climbing a mountain. This was the first camping trip I have been on since I was 6-years old and it has left me with plenty of tips and must-haves to share with you. Since it was the hubs and my first time camping in quite a while, we brought plenty of goods- some of it we used and swear by and some of it will not be packed in our camping bag again. These 5 must haves for camping are all the little things I would not venture on any camping trip without.

1. An Infinity Scarf

You may laugh at this and think I am such a city girl gone glamping, but it is for waaayyy more than looks. My infinity scarf was the most used and most appreciated thing I brought... Well, other than food and a tent. The scarf will keep your neck warm and ward off any unwanted bug bites on that super sensitive area. I also used mine as a eye mask to keep the early morning sun out, as extra umph to my camping pillow, a hood when things got wet, a napkin when hands got dirty, and a pot holder. Yes, the infinity scarf turned out to be the best portable oven mitten ever!

My best advice would be to bring an infinity scarf that is made out of a gauze-like material and one that you do not mind loosing to the elements.

2. Flip Flops

No, you will not be wearing these whilst hiking, but yes, you will be wearing them almost everywhere else. Sure, hiking boots or sneakers are great when you are roughing the elements, but no one wants to worry about untying and retying them every time you go into or come out of the tent. And don't even think about wearing those muddy sneakers inside your camping abode. Instead, pack a pair of sandals that you can wear around the campsite and easily put on or kick off.

3. Cotton Balls

We like to start a fire the simple way, some tinder and that scratchy spark-maker thing wisely called a "fire starter." Sometimes however, nature does not make things so easy or dry. Cotton balls make the easiest tinder and the best cheater method for starting your fire. Besides, most girls have them in their toiletries bag anyway :)

4. Baby Wipes

Most camp sites do not have showers or, they are the kind you would prefer not to use (another reason to bring flip flops). Sure, you could purchase and lug one of those portable showers everywhere with you, or, you could just purchase a pack of pretty scented baby wipes. No, it is not a five-star bath house, but it will do the trick after a long day of hiking. Baby wipes are my best secret to staying clean and smelling good the whole camping trip long!

If you are really wanting to glam it up, some dry shampoo, a good deodorant, and facial cleansing wipes are pretty great to have as well!

5. A Good Attitude

Bear Grylls says that one of the most important parts of being in nature is your attitude. Remember, you are in the elements and things might not always go according to plan. There will be bugs and some nights, there will be lots of rain and little food. My best advice would be to get over these trip snags as quickly as possible and remember why you are out there in the first place.

All of the things listed above along with a tent, good sleeping bag, food that does not need to be heated, water, snacks, and hair ties will make a camping trip easier, but nothing will make or break a trip like the attitude going in and coming out of it. Camping is super fun, just go with the flow, relax, stay positive, and you will be sure to love it!!

P.S. A handy tip would be to know the wildlife in the area... We knew of bears but had no idea there would be rattlesnakes- these are the little, vital things to know :)

Oh, and one more thing... I am so excited about tomorrow's post talking all about our trip on the Appalachian Trail. There will be lots of pictures too!!!

Comment

TAGS: things, to, know, when, camping, first, time, campers, what, bring, essentials, for, a, great, camp, experience, trip, weekend, how, prepare, must, haves, surprising, tricks, that, make, better, nicer, easier, livable, ways, way, packing, list


August 14, 2014

TBT: 6 Ways to Use Push-Up Bars

by Jenni in Fitness


TBT: 6 Ways to Use Push-Up Bars

Push-up bars have quickly become one of my favorite (and only) workout tools. They are great for increasing a workout's intensity, while decreases stress and strain on your joints. The increased range of motion gives muscles a longer distance and amount of time to work. This means that the same exercise done with push-up bars can work more muscles for longer and give better results than a workout without. If you have ever suffered from sore, tight wrists when done with a plank workout or a set of push-ups, these will help decrease that pain and stiffness during and after the workout. I use my push-up regularly after a jog when I am doing my plank workout and find my shoulders and wrists are less stiff post workout, while my range of toning increases!

There are plenty of ways and workouts that we can benefit from using the push-up bars, these are six of my favorites that will increase results and work everything from the arms and back, to the bum and legs, to the core.

Push-Ups

Doing regular push-ups with push-up bars is a great way to vary a common routine. The difficulty level is increased with these since you can go about two inches lower. Complete a regular push-up with bars out straight and palms facing in, then lower down so you are almost touching the ground, hold, and return to starting. So great for the arms, shoulders, chest, and back.

Wide Arm Push-Ups

These are great for working the back and triceps. Place the bars so they horizontal  and a bit more than shoulder width apart. Hold the bars so your fists are facing forward and the bars are in the same line as your shoulders. Lower down so your head is level with the bars, hold, then rise back up.

Shoulder Press

This is a step up from the usual push-up and will work your shoulders, chest, and arms. Go into push-up position with bars under shoulders and feet resting on a chair. Complete the push-ups as usually with feet remaining stationary on the chair the entire time. If you would like to increase the difficulty, place feet against a wall instead.

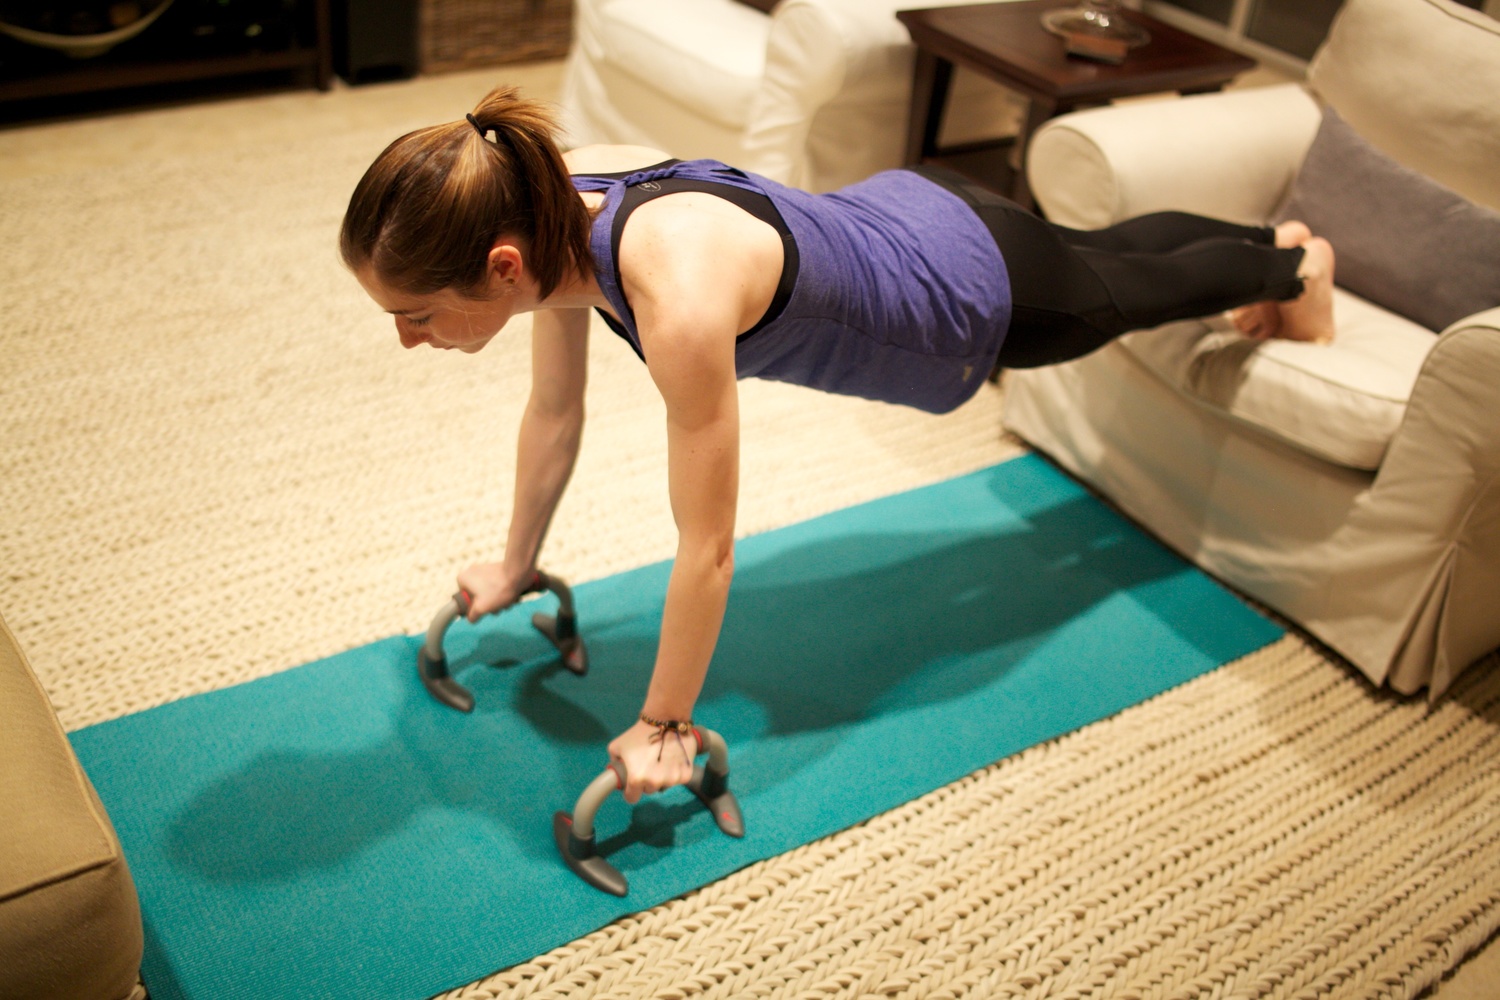
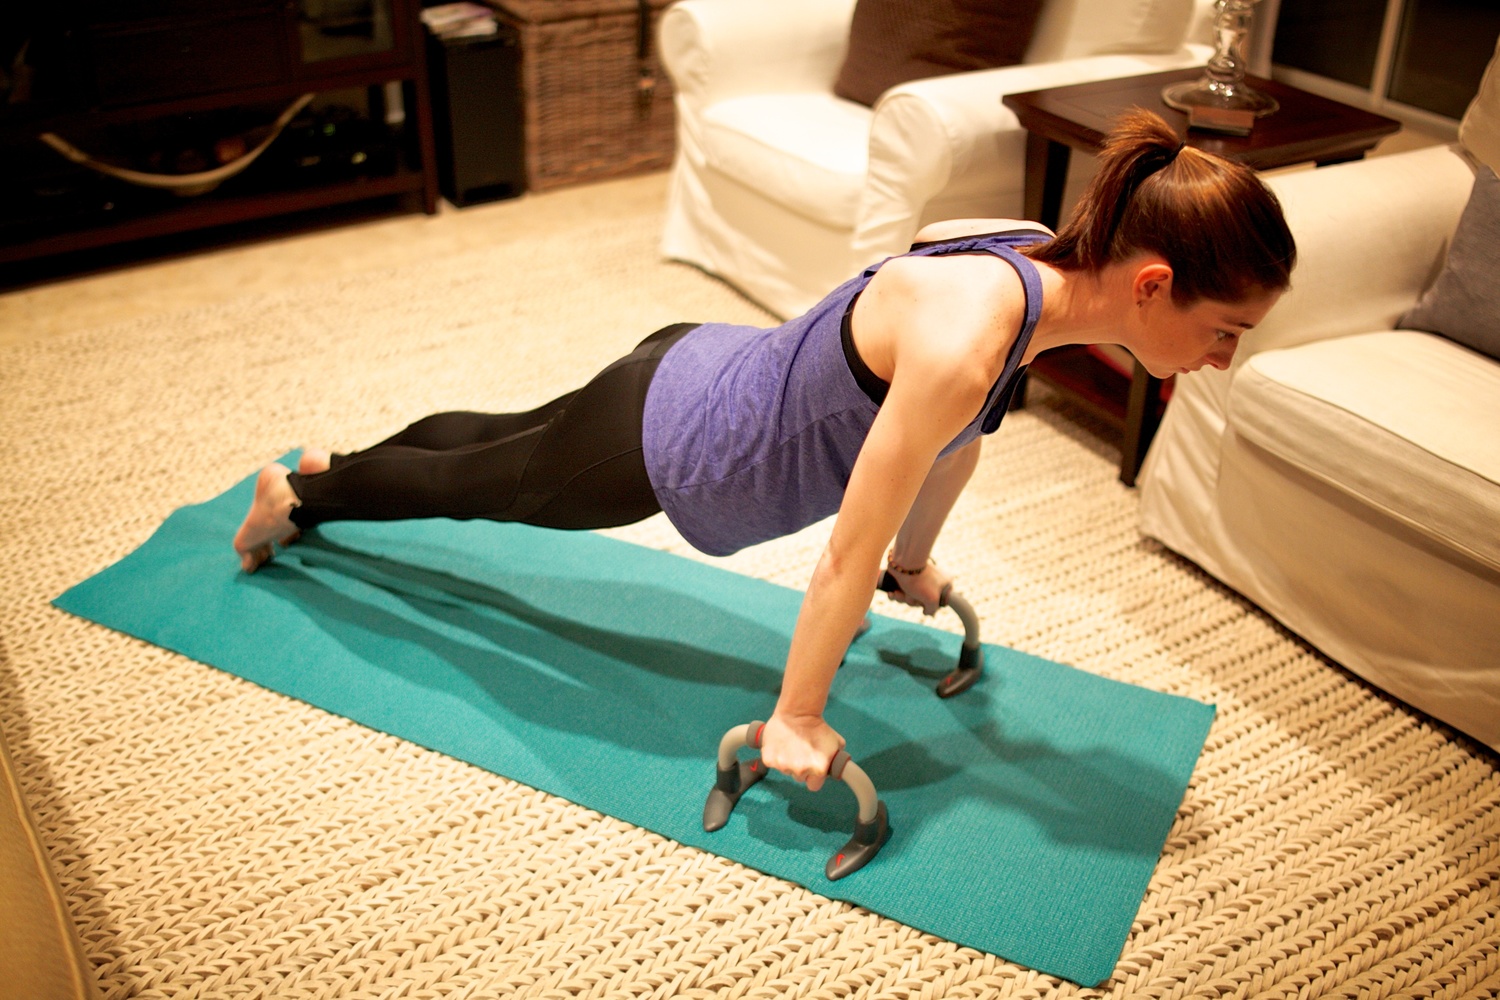
Plank Toe Rolls

Go into plank position and begin on the balls of your feet with arms in alignment with shoulders. Roll your body forward so your you are on your tip toes and your shoulders are above the arms. Be sure to keep your core tight and body fluid while moving. Hold, then return to starting position. This is great for the inner thighs and core!

Leg Tucks

Leg tucks will give your core and arms a workout. Begin by sitting on the ground with arms to the side and palms facing in- holding the push-up bars. Raise your body off the ground so your arms are supporting most of your weight but your feet are still at rest. Tuck your feet and bend knees into the chest. Hold, then extend the right leg. Hold the right leg out while the left is still tucked in, then tuck both legs to the chest. Repeat, extending the left leg out. The straighter your leg and back are, the better the results will be. To increase the intensity, try extending both legs together.

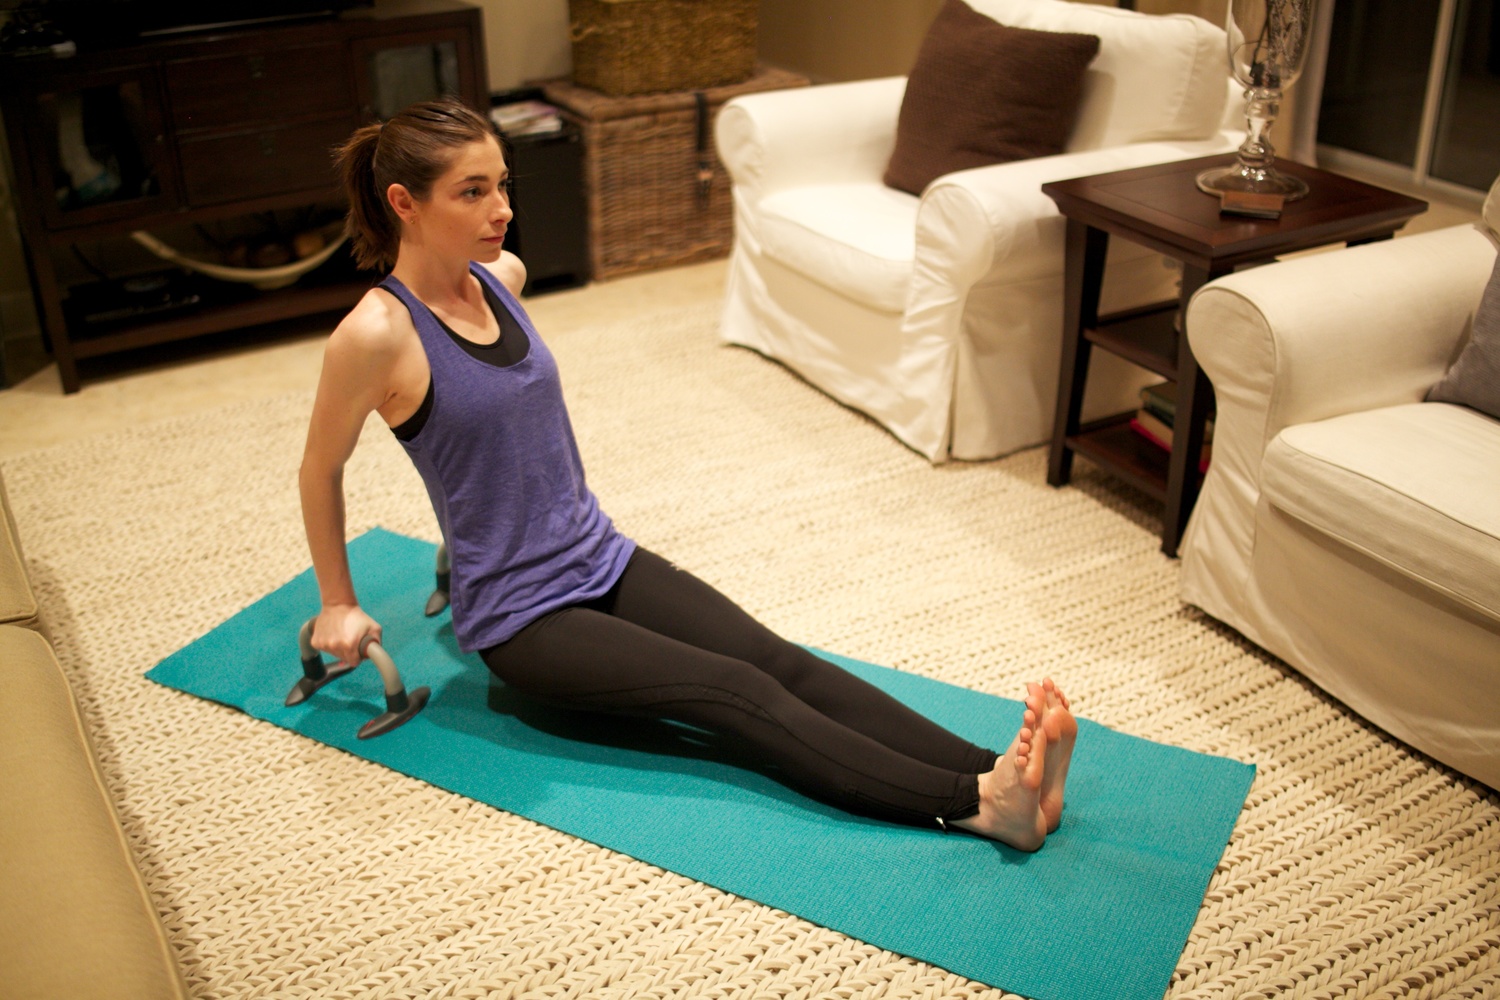
Triceps Dip

Like the name implies, these are will work your arms, and more specifically, your triceps. Begin in the same position as the leg tucks with arms by your side and palms facing in. Legs should be extended and heels should be on the ground. Lift your body up so your arms are supporting most the weight. Bend arms backward so the body lowers toward the ground and hold right before the bum touches the floor. Slowly come back up to starting position.

Push-Up
Push-Up
Wide Arm Push-Up
Wide Arm Push-Up
Shoulder Press Part I
Shoulder Press Part II
Plank Toe Rolls Part I
Plank Toe Rolls Part II
Leg Tucks Part I
Leg Tucks Part I
Leg Tucks Part II
Leg Tucks Part II
Triceps Dip
Triceps Dip
Push-Up Wide Arm Push-Up Shoulder Press Part I Shoulder Press Part II Plank Toe Rolls Part I Plank Toe Rolls Part II Leg Tucks Part I Leg Tucks Part II Triceps Dip

This post has been, by far, the most popular article on P+K yet- which makes me wonder, did you come to P+K through 6 Ways to use Push-Up Bars? Originally posted on January 15th, 2013

Comment

TAGS: 6, ways, to, use, push-up, bars, how, workout, exercise, exercises, way, i, would, like, learn, know, leg, with, upper, body, arms, arm, triceps, toe, rolls, are, push, up, bar, better, for, wrists, wrist, hurts, when, in, plank, reduce, pain


July 25, 2014

How Do You Run Safely?

by Jenni in Lifestyle


Kitestrong- Stay Safe

Since I have started running outside waay more often, I have also started thinking a lot more about running safety. Of course this means running on the proper side of the road, wearing bright colors, have a phone with you at all times, and not running during busy traffic times. That last one is more important up here since we are running on roads with no sidewalk and no shoulder at times. Other than the basics though, how do you stay safe while running?

The hubs just got me a new key chain pepper spray and had requested that I never run alone without it. I think both of us watched waaaayyy too many episodes of Unsolved Mysteries at far too young an age. Especially since, now that I have it, I would never consider running outside without it.

For all those other issues that could befall me when running, I have turned to Kitestring. Kitestring is, possibly, the best use of my cell phone ever... Other than Instagram, obviously. This is not an app (thankfully since my storage is at about 1 mb free space), it is a number you have saved and simply text. Going out for a jog? Walking down a creepy ally? Going to buy something on Craigslist? Just text Kitestring the amount of time you should be done in and they will check on you when that much time has passed. If you are safe, you send a quick message back. If not, they will notify your emergency contacts right away.

There are two options for Kitestring, the free one and the $3 a month one. With the free option you get eight outings a month and one emergency contact. For $3 you get unlimited emergency contacts, unlimited outings, and two upgrades called perennial mode and a customizable check-in period.

Comment

TAGS: be, safe, while, jogging, running, out, for, a, run, jog, how, to, best, ways, way, apps, being, safety, free


March 11, 2014

10 Quick Tips for a Successful Handstand

by Jenni in Yoga


{via}

This last week I was able to accomplish my first handstand with some massive help and a few fantastic tips from my new favorite yoga instructor. Of course, one handstand does not make me an automatic headstand master of yoga awesomeness, but it did help me figure out a few quick fixes that have been blocking my progression. Hopefully, these ten tips will help any newbie to handstands get rid of those mental and physical road blocks that can hold us back from accomplishing your inversion dreams and anything else. Turns out, handstands do no have to be super difficult, and they can actually be quite fun!

The Shoulder, Shoulder Principle

Keep hands directly under shoulders and shoulder width apart. If you are not sure exactly where that means, try placing a yoga block length-ways between your thumbs, this should be about the right amount of space.

Bend the elbows

Apparently, having flexible elbows and arms is not what you want when doing a handstand. Keeping my arms super straight massively increased my risks of overextending them and reduced the weight they could support.

Use all your hands

This is one I am so guilty of not doing. Place weight evenly from the back of your palm all the way to the fingers. Fingers should be active here and can even be curled downward a little to help activate every portion of the hand.

Activate the arms

This may seem quite obvious, but it was my biggest problem. The arms should be activated and elbows should be pushing towards the mid-line of the body. A good visual that my instructor gave me is to pretend you are squeezing a yoga block between your upper arms. Hands should be facing forward and elbows facing back, not out.

Shoulders down

When we activate the arms outward, the shoulders kind of naturally do this on their own. Be sure that your shoulders are staying down and back to ensure proper posture. This also helps make sure your spine does not banana.

Feet on wall

This is great for those not quite ready for a total handstand attempt. Stand leg distance from a wall and place your foot flat on the wall parallel to the ground. Turn around and adjust the leg so hips are even and the foot is facing downward, then hinge at the hips and place both hands on the floor and both feet on the wall. Practice all of the other tips here as well :)

Hips should lead, not legs

Guilty, again. When popping up to a handstand, it is super easy to kick the legs up and hope something sticks. This tends to lead to messy falls and not so graceful flops. Instead, keep hips even with one leg on the ground and able to push-off. Having the hips lead will give you more control.

Keep back straight

Balance is balance and keeping things straight helps balance. Curving the back can make handstands much harder because we are not gravitationally centered. Keep the back activated to stop from the banana effect.

Keep the back to the wall

Start against a wall to get your balance right. The way that my instructor told me is to get the head about 1-inch away from the wall, maybe less, and try a handstand from there. When you get into the handstand, you should almost be completely against the wall. This makes finding the center of gravity much easier. You can kick off the wall as you get more comfortable.

Overcome that fear

Handstands are so much more mental than physical. The best way to overcome that mental road block is to start practicing against a wall, with friends, or in a class. Our bodies are pretty amazing and can do incredible things, let's add handstands to that list together!

Comment

TAGS: tips, for, hw, how, to, complete, a, headstand, handstand, what, do, best, way, beginners, guide


  • Oh look, @jcrew sent us a cat, and in my favorite color too!! How kind of them 😻 http://t.co/MNEjROeSpE
    Oct 14, 2014, 9:54 AM
  • This Week in Workouts (3)
  • Meat Free Monay (11)
  • Simple Systems (12)
  • Thrifty Girl (12)
  • Meat Free Mondays (20)
  • Yoga (30)
  • Health (51)
  • Food (61)
  • Lifestyle (162)
  • Fitness (312)

Copyright © 2012 · All Rights Reserved · Pen + Keyboard